

Today I gonna show you how to install and setup the amazing views slideshow module on Drupal7.
This tutorial is now uptodate with latest modules!!!
(1) Required Modules (Version: Drupal7.0)
- Views (7.x-3.0-beta3)
- Views Slideshow (7.x-3.0-alpha1)
- Chaos tool suite (7.x-1.0-alpha4)
- Libraries (7.x-1.0)
- Link Field (7.x-1.0-alpha3)
- Token (optional) (7.x-1.0-beta1)
(2) Install the Modules
In Drupal7 you can install modules from the admin section, but I still feel this new feature doesn't have any meaning, because we have to search for the module link in the Druapl site and then copy paste into the admin module installation area, really crazy. It would have been so good if they would have made it something like wordpress a small search feasture. Anyway I just gonna download and istall it in the old way (I still recommend this old way).
Download all the modules from Drupal site and install in the directory yoursitename/sites/all/modules.
Go to http://www.yoursitename.com/node#overlay=admin/modules and enable these modules as below;
(1) Views (2) Views UI (3) Views Slideshow (4) (5) Chaos tools (6) Link (7) Libraries (8) Token (Optional)
(3) Create Image Cache
In Drupal7 imagecache is part of core module and is named as Image styles. So let's create two image cache from here, one for the full size slider image and other for the thumbnail image. In this tutorial I use 935x293 (pixels) dimension for the full size slider image and 210x100 (pixels) dimension for the thumbnail image. Note: These configurations csn be defered depends on your needs.
* Fullsize Slider image settings
Go to http://www.yoursitename.com/node#overlay=admin/config/media/image-styles and click on the add new style link
(1) Give an Image style name and click on create new style button
(2) On the next configuration screen select new style you want and then click add button (In this tutorial I choose resize style)
(3) On the next screen set the width and height and click on the add effect button. (The settings may vary depend on the style you choose). I set width as 935 and height as 293 pixels.
Do this same process for the thumbnail image too. (for the thumbnail image dimension, I set width as 210 and height as 100 pixels.)
(4) Create New Content Type
Let's create a new content type, From the dashboard menu bar cick on Structure and then content types then click on the add new content type link.
(1) Give a human-readable name, I named it as Featured Slider (machiine name will be auto generated based on the human readable name)
(2) Give a brief and relevant description
(3) Submission form settings, I leave as the default settings
(4) Publishing options, I checked only published (all other settings unchecked)
(5) Display settings, I have unchecked the authour and date info.
(6) Comment settings,I set hidden (disabled)
(7) Menu settings, I leave as default settings.
(8) Click Save and add fields Button
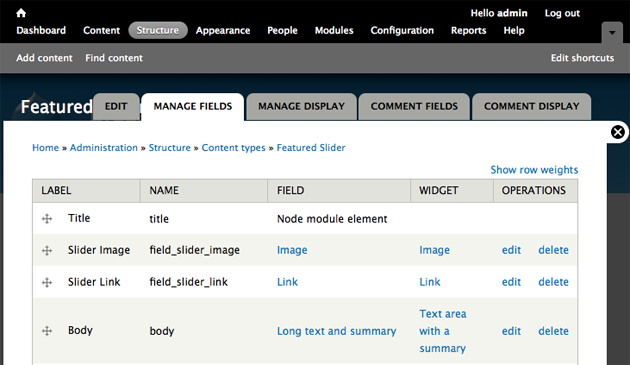
(5) Create New Fields
Here in this example I create only two fileds, and they are image field and link field.
We will use image field for uploading our slider image and link field for creating a custom link where we want our slider to be linked.
Image Field Settings
(1) Label: Slider Image
(2) Field: slider_image
(3) Field type: image
(4) Widget (form element): image
(5) Click Save button, and on the field settings page leave default settings and click on Save field settings button.
(6) On the image field configuration settings page you can configure as you wish.
I set this field as required, I added a file director name called slider-image so that this images will be arranged sperately from other images.
You can set the maximum upload size and resolution here, I have anabled alt and title field and finally click Save settings button.
By using same method create the link field too.
Link Field Settings
(2) Field: slider_link
(3) Field type: link
(4) Widget (form element): link
(5) Click Save button,
Image field
Link field
Body field (you can even remove this field if not necessary)
I have set the link field as hidden and I have also set image label as hidden
(6) Create Feature Slider Content
I have created four featured slider content for this tutorial.
(1) Click on add content link
(2) Create Featured Slider content
(3) Give a proper title name
(4) Upload slider image
(5) Give alt and title field names
(6) Give a link title and url where you want the slider to be linked
(7) Leave all othe settings as default except for the path field if yo want you can give an SEO friendly URL alias.
(8) Save the content.
Same way create more Featured Slider contents (I have created four contents)
(7) Create a New View
Now it's time to create our new Slideshow view.
From the Dashboard menu click on the Structure and then click on the Views.
(1) Click add new view
(2) Give view name, I have named as Featured Slider (machiine name will be auto generated)
(3) Give an apropriate view description
(4) Choose Show Content of type Featured Slider (your content type name).
(5) Uncheck Create a Pge and check Create a block
(6) Type in Block title and choose display format as "Slideshow" of "fields" items per page 5 (you can enter the number of items you want to display)
(7) Click the button "Continue & edit"
Views Field Settings
First let's add link field (link must be the first field in order to work everything properly) so click on the add icon and from the filter Groups select Content
Add Content: Link, Click "Add & configure button" in the next cofiguration window uncheck "Create a label". "Check" Exclude from display.
Click "Apply button"
Next let's add image field, so click on the add icon and from the filter Groups select content
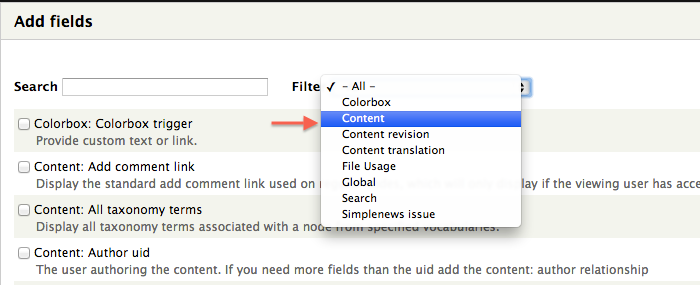
Add Content: image field (Note: make sure you choose the image field which we crerated for this slider content type only.)
Click "Add & configure button" in the next cofiguration window uncheck "Create a label".
Formatter: Image (if you have installed Colorbox or lightbox you can choose them here!)
Image Style: Fullsize (Choose the imagecache you have created in the above step)
Link image to: Nothing
Style Settings: Leave default settings
No result behaviour: Leave default settings
Rewrite Results: Check Output this field as a link
Link path: [view_node] (Note:Scroll dow a bit and you can see replacement patterns created by Core Token module, (if we didn't set the link field as first we can't see link field option here) copy only [view_node] then scroll up and paste it in the link path field.)
Click "Apply button"
Finally we need one more field for the thumbnail, so let's click on the add icon and from the filter Groups select Content
Add Content: image field (Note: make sure you choose the image field which we crerated for this slider content type only.)
Click "Add & configure button" in the next cofiguration window uncheck "Create a label" and CHECK EXCLUDE FROM DISPLAY,
Formatter: Image (if you have installed Colorbox or lightbox you can choose them here!)
Image Style: Thumbnail (Choose the imagecache you have created in the above step)
Link image to: Nothing
Style Settings: Leave default settings
No result behaviour: Leave default settings
Rewrite Results: Check Output this field as a link
Link path: [view_node] (Note:Scroll dow a bit and you can see replacement patterns created by Core Token module, (if we didn't set the link field as first we can't see link field option here) copy only [view_node] then scroll up and paste it in the link path field.)
Click "Apply button"
Views Filters Settings
In views3 the filters are created in the beginning while we choose the content type and other settings! If you need any additional filetering you can create it here!
Views Style Settings
Click on the Format Slideshow | settigs and on the next configuratioin window set as below;
(1) List type: Unordered list
(2) Wrapper class: Leave default settings
(3) Style> Skin: deafult
(4) Slides> Slideshow type: cycle
(5) Cycle options
You need to download jQuery cycle plugin and copy jquery.cycle.all.min.js to sites/all/libraries/jquery.cycle You can find the plugin at http://malsup.com/jquery/cycle.
IN SIMPLE ENGLISH
Create a folder named "libraries" in the site/all directory and then create an another folder named "jquery.cycle" in that directory and finally copy and paste only the "jquery.cycle.all.min.js" into this directory.
(6) Transittion: Fade
(7) Action: pause on hover
(8) Internet Explorer Tweaks: default
(9) Widgets: You can choose either or both Top and Bottom (I choose bottom here, and the advance settings as below;)
(10) Bottom Widgets>Pager>Pager type: Fields
(11) Pager field: Content: Image (Note: last one we added for the thumb, don't mistake since both field will be named same.)
(12) Activate Slide and Pause on Pager Hove: checked, controls and slider counter leave unchecked.
(13) Click Apply button.
Format Show Field Settings
- Inline fields: Choose the thumbnail field as inline.
- Click Apply button. (Note: Well it actually doesn't change much in appearance but it does change in the code. Next step use the firebug and find the class and add some styles to display properly.)
(8) Create a Custom Region (optional step)
(1) On your thems folder open the your_theme_name.info file and add a new region like this shown below;
regions[featured_slider] = Featured Slider and save the .info file.
(2) Open your themes page.tpl.php file and add these code where you want your slide to be displayed as shown below;
<?php if ($page['featured_slider']): ?>
<div id="featured-slider">
<?php print render($page['featured_slider']); ?>
</div> <!-- End Featured Slider-->
<?php endif; ?>
You can even create custom front page template like page--front.tpl.php so that you do't need to make any changes to the default page.tpl.php template.
[9] Enable & configure the Block
Now this block will be visible in the blocks disabled area, so from the Dashboard menu go to Structure>Block and enable the block to a themes default region or the custom region we created (featured_slider). (Regions varies depends on the theme you are using.)
Block Configuration Settings
After enabling the block you get a link to configure the block so click on the Configure link and on the settings section set as below;
(1) Block title (if you don't want blobk title to be displayed just type <none>)
(2) Again you get all enabled theme specific Region settings.
On visibility setings
(3) Pages>Show block on specific page: choose Only the listed pages and type <front> so that this block will be displayed only on the front page.
CSS TIPS TO DISPLAY THUMBNAILS INLINE
Add these CSS codes to your themes style sheet to display the thumbnails inline.
.views-slideshow-controls-bottom .views-slideshow-pager-field-item { float: left; margin: 20px 6px; } Make necessary adjustments.
That's all now we have successfully created our new Views Slideshow on Drupal7. I hope yo could understand the tutorial I tried my best to explain as much as I can, if you still have doubt's comment below and I will try my best to help. The scren cast of this tutorial will be coming soon.
Play around and find the best you can in Drupal7, Best wishes.